Confronting histories of racism and oppression
In 2020, America once again turned its focus to the long, unbroken history of systemic racism and oppression of Black, Indigenous and People of Color (BIPOC, see www.thebipocproject.org). The facts of systemic racism have, unfortunately, changed little in centuries. The situation merely became so bad that more of the country paid attention for some time.
Science and technology fields have, in many cases, actively excluded BIPOC and women. It will remain to be seen if the conversations, commitments, and promises of action turn into true, lasting change to improve inclusion of historically marginalized groups.

It is my hope that all feel welcome in this class and that we build up and cherish the strengths of all, regardless of race, ethnicity, gender identity, sexuality, socioeconomic status, religion, nationality, neurodiversity, or physical disability. I stand against violence and in solidarity with the Black Lives Matter movement.
Why is this in a coding class?
It should probably have been there from the first day of class. It is my hope that all have felt included and supported so far. We have immersed ourselves in the tools of Linux and the command line: tools that have been developed by and for a largely white, male, cisgendered community. A community that has a long history of sexist, racist actions.
Progress is slow, but I am encouraged by groups such as Women who code, BlacksInTech, and /dev/Color. We must do better.
One action, small as it is, that we can take is to change the terms we use when they do harm to others.
Small changes to reduce harm
In this section, we are starting to work with git and GitHub. The historical, and until October 1, 2020, default name for the main branch of a git repository is master. Similarly, the terms “master” and “slave” are frequently used in computer programming and hardware for controlling and subordinate processes/devices, respectively. This terminology is offensive and unnecessary. Importantly, it is easy to make changes in order to create a more inclusive community, and, I believe, we must do so.
There has been much discussion on the topic in the tech community. It is clear that
‘master’…brings the idea of human bondage and suffering to mind for a non-trivial number of people” (Brian Carlson).
As such, many organizations, such as the Software Freedom Conservancy and GitHub have pledge to work to change the convention to instead use the name main for the main branch of a repository.
We are still in the process. In fact, my first attempts to transition this site failed as GitHub only allowed websites to be based on the master branch. That changed on July 31, 2020 and this site was transitioned to use the main branch on August 6, 2020, when I learned of GitHub’s new feature. Incidentally, the transition took about 5-minutes–it is truly a small change that I hope causes a little less harm.
Configure the default branch name in GitHub
As of August 26, 2020, you can now change the default name for your repositories, and on October 1, 2020, that default will become main unless you opt out.
main.• Follow this link to change settings for your personal account.
• Click the ‘Update default branch name now’ button to update your default.

• The new name filed will be pre-populated with the suggested
main name and you can just click the Update button.
Getting setup in github.com
One thing that TLCL doesn’t include that I think is critical for good coding is the use of version control, like git. We already created a github.com account and created a repository through the github classroom.
As we embark on writing shell scripts, we will continue to use git and github. To get things setup, let’s create your first repository from scratch.
Setup SSH Keys for your account
As of August 2021, GitHub.com no longer supports using username/password to work with repositories. You should setup and add a public ssh key to your github.com account. GitHub has good instructions on doing this, but the main steps will be replicated here. If you encounter problems, I suggest checking the detailed instructions from GitHub.
-
Open a Terminal and login to HiPerGator
-
Create an ed25519 ssh key pair to use for GitHub. As outlined here, type:
ssh-keygen -t ed25519 -C "your_email@example.com"(Replacing the email address with the one you used when creating your GitHub account.)
- If you can’t remember which email you used for your GitHub account, you can check at this link: https://github.com/settings/emails.
-
After typing the above command, you will be asked to enter a file in which to save the key. Hit
Enterto accept the default name.Note: The name and location of this file are important! Using a different name or changing the location will cause the key pair to not work.
-
Then you will be asked to enter a passphrase. Leave this empty. This is somewhat less secure, as anyone who has access to your private key would be able to impersonate you. However Jupyter Lab and many GUI interfaces do not work with ssh keys with a passphrase. If you want to use GitHub in Jupyter Lab, do not add a passphrase–just hit
Enterfor the passphrase and verification. -
Now that you have created the ssh key pair, we need to add the public portion to your github account. Type
cat ~/.ssh/id_ed25519.puband then copy the output. -
Go to your GitHub Settings at: https://github.com/settings/keys.
-
As outlined here, click the New SSH Key button.

-
Give the key a name, “HiPerGator” for example, and paste the public key text you copied above into the Key box.
-
IMPORTANT: Do not skip this step!! Test the key and add github.com to your known hosts. Back in the Jupyter terminal, type:
ssh -T git@github.com(do NOT replacegitwith your username. Type the command exactly as-is).- You will likely get a message that the authenticity of the host ‘github.com’ can’t be established. Type ‘yes’ to continue. You will get a Warning that the host has been permanently added to the list of known hosts, and then it should have a line that says:
Hi github_username! You’ve successfully authenticated, but GitHub does not provide shell access.
- You will likely get a message that the authenticity of the host ‘github.com’ can’t be established. Type ‘yes’ to continue. You will get a Warning that the host has been permanently added to the list of known hosts, and then it should have a line that says:
That is your indication that everything is setup correctly!
Video walk-through
There is also a short video with a walk-through of setting up ssh keys with github (Requires UF login).
Configuring git
From: https://git-scm.com/book/en/v2/Getting-Started-First-Time-Git-Setup
The first thing you should do when you install Git is to set your user name and email address. This is important because every Git commit uses this information, and it’s immutably baked into the commits you start creating:
$ git config --global user.name "John Doe"
$ git config --global user.email johndoe@example.com
Again, you need to do this only once if you pass the –global option, because then Git will always use that information for anything you do on that system. If you want to override this with a different name or email address for specific projects, you can run the command without the –global option when you’re in that project.
Many of the GUI tools will help you do this when you first run them.
Create the repository on GitHub
- Log into your github.com account.
- There are two ways to create a new repository. Either click the +-icon on the top right and select “New repository”, or click the green “New” button on the left.

- For the Repository name, enter “hello_world” (you can use whatever name, but do not use a space!). If you want, you can add a description.
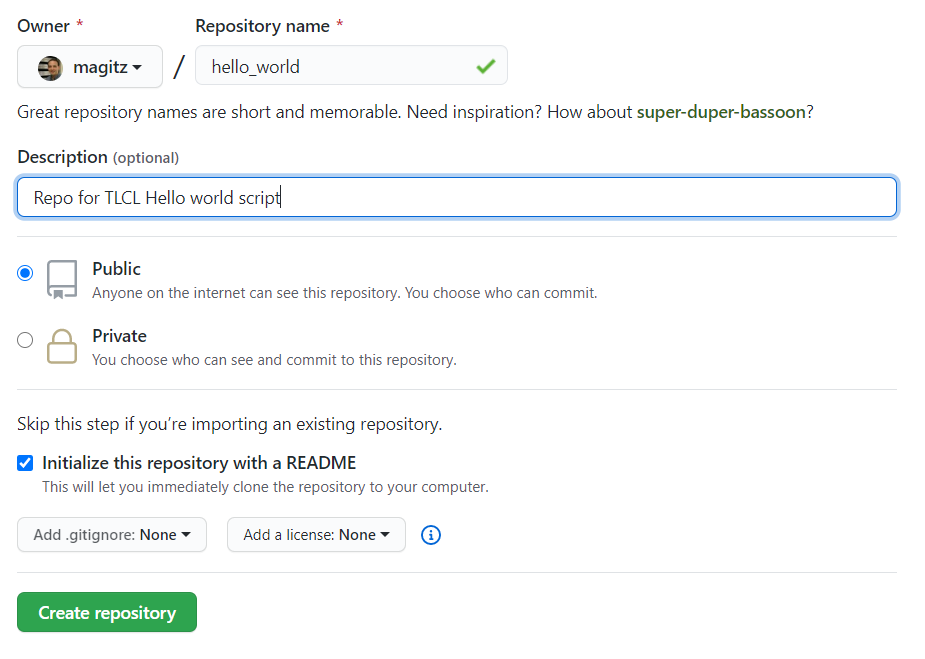
- Check the “Initialize this repository with a README” checkbox and click the green “Create repository” button.
- That will create your repository and setup a template markdown file for the README.md–every repository should have a README.md file that describes the contents of the repository.
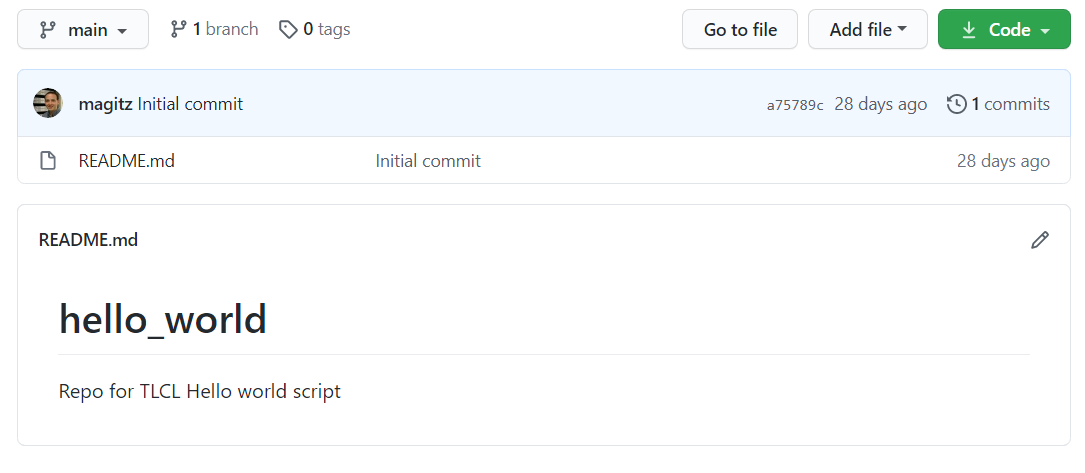
-
If you have not set your default branch name to
main, change the name of the main branch tomain.- Click the Branch button that currently says master, type “main” in the box and hit Enter or click “Create branch main from master”.
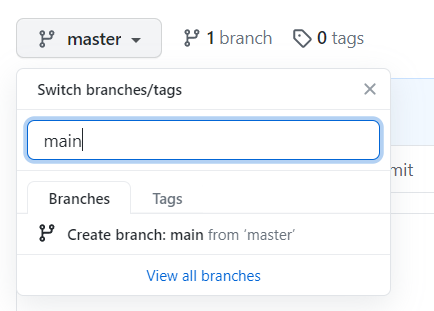
- Now we have two branches, main and master, but master is still the default. Click on the Branches button again and click on the the “View all branches” link at the bottom of the dropdown.
- Click the “Change default branch” button.

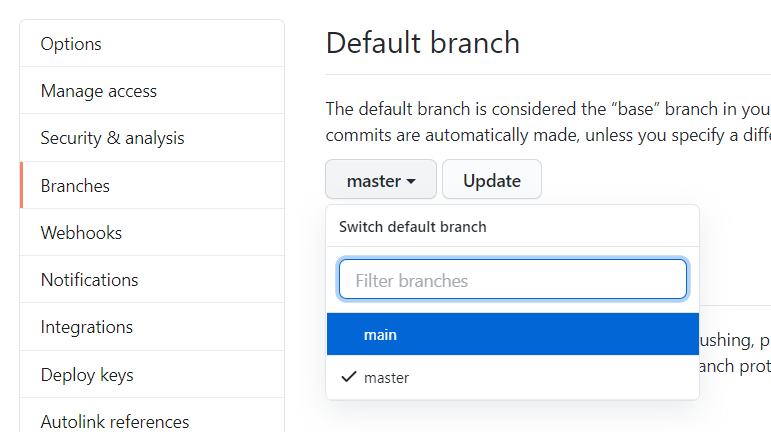
- This will take you to the Branches portion of the Settings page. Click on the master and select the main branch and click Update. On the window that pops up, click that “I understand, update the default branch.”
- Click either the “<>Code” tab or “hello_world” link at the top and go back to the main page of the repository.
- You now have the
mainbranch set as the default. If you want, you can click on the Branches button and View all branches again, then delete the master branch!
- Click the Branch button that currently says master, type “main” in the box and hit Enter or click “Create branch main from master”.
Clone the repository to HiPerGator
Now we want to make a copy of the repository on HiPerGator.
- Click the green Code download button and click the copy button next to the URL to copy it.
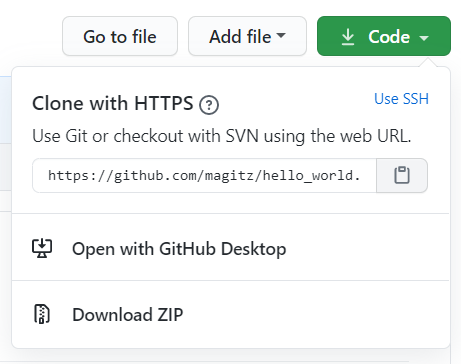
- Log into HiPerGator and
cdto where ever you want to put this–your home directory is fine, so you can stay there if you want. -
Type
git clone(with a space at the end) and paste the copied URL. Hit enter. The command and output should look like this:[magitz@login3 ~]$ git clone https://github.com/magitz/hello_world.git Cloning into 'hello_world'... remote: Enumerating objects: 3, done. remote: Counting objects: 100% (3/3), done. remote: Total 3 (delta 0), reused 0 (delta 0), pack-reused 0 Unpacking objects: 100% (3/3), done. [magitz@login3 ~]$
Now we are ready to write our scripts…so back to the text.
Ch 24: Writing Your First Script
I had to make a quick cut in this video, here’s the second part of this.
Setup nano to show syntax highlighting
-
p. 364: How to Write a Shell Script: point one talks about different text editors. There are many options, the easiest for now will be the
nanotext editor. Before we use that, let’s turn on syntax highlighting. This makes it easier to read scripts by adding color to different kinds of things. Nano uses a file called .nanorc (a hidden file) stored in your home directory to control this. I have a template you can copy to your home directory. Copy and paste the following command on the terminal while logged into HiPerGator:cp /blue/bsc4452/share/Class_Files/TLCL_files/.nanorc ~/ - Before you start writing the hello_world script, change directories into your repository directory: e.g.
cd hello_world -
p. 365: Script File Format: As noted, we will use the nano text editor. To create the hello_world script, type:
nano hello_world.sh. The.shending is not needed, but, I think it helps you know that the file is a shell script and suggest using meaningful file extensions.Important: Remember that we called the scripthello_world.sh, so be sure to add the.shwhen following along in TLCL. -
p. 366: Executable Permissions: Before you change the execution permissions, try running your script:
  [magitz@login3 hello_world]$ ./hello_world.sh
  -bash: ./hello_world.sh: Permission denied
  [magitz@login3 hello_world]$
The
./says to look in the current directory. As TLCL mentions in this section, we can’t run the script like this because it doesn’t have execute permissions set. There are actually a couple of ways around this. One way, as the text does, add execute permission, the other is to call it slightly differently:[magitz@login3 hello_world]$ bash hello_world.sh Hello World! [magitz@login3 hello_world]$Since
bashis the program that is running,hello_world.shdoesn’t need execute permissions. I frequently take this route. Seems easier to me than messing with permissions…do what works best for you… -
p. 366: Script File Location: This section gets into the PATH variable, which is really important to understand, and PATHs are critical and the source of many problems for users.
The PATH variable is our first example of an environment_variable. To see the value of the PATH variable, use the echo command:
 [magitz@login3 ~]$ echo $PATH
 /opt/slurm/bin:/usr/lib64/qt-3.3/bin:/usr/local/bin:/usr/bin:/usr/local/sbin:/usr/sbin:/opt/puppetlabs/bin:/bin:/opt/dell/srvadmin/bin:/home/magitz/bin
 [magitz@login3 ~]$
Your PATH is a list of directories, strung together with
:s where the operating system will look from programs you ask to run. It will start in the first directory in the list and work its way through to the last one. So, order does matter–if there are applications with the same name, the first one found will be the one run. We typically speak of prepending to the PATH vs appending.By convention, environment variables are written in
ALL_CAPS.The text discusses a couple of options:
- You could move your
hello_world.shscript to a directory in your PATH. And you will see that/home/<gatorlink>/binis in your PATH by default. But, that would move it out of the git repository and all the goodness that comes with version control. - You could add the current directory to your PATH, but that can lead to a very long list of PATHs and cause other issues.
- Personally, I generally suggest that for your own scripts, just use relative or absolute PATHs to call the script. So, either
./hello_world.shor~/hello_world/hello_world.sh.
- You could move your
add, commit and push your changes
-
Before we move on, we have a functional copy of a new script. Now is the time to tell git, we want to track the
hello_world.shfile (git add hello_world.sh), commit the changes we’ve made (git commit -m "First version of saying hello") and push them to the remote repo (git push).[magitz@login3 hello_world]$ git add hello_world.sh [magitz@login3 hello_world]$ git commit -m "First version of saying hello" [main 8c29b7f] First version of saying hello 1 file changed, 3 insertions(+) create mode 100644 hello_world.sh [magitz@login3 hello_world]$ git push Counting objects: 6, done. Delta compression using up to 32 threads. Compressing objects: 100% (5/5), done. Writing objects: 100% (5/5), 625 bytes | 0 bytes/s, done. Total 5 (delta 1), reused 0 (delta 0) remote: Resolving deltas: 100% (1/1), done. To git@github.com:magitz/hello_world.git cf23ef4..8c29b7f main -> main [magitz@login3 hello_world]$That is it for this repository.
Ch 25: Starting a Project
sys_info_page and clone that onto HiPerGator.-
p. 371: First Stage: Minimal Document: To view this page in a browser, you will need to download the file and open it on your computer.
-
p. 372: First Stage: Minimal Document: We will make the sys_info_page file in the sys_info_page git repo directory, not ~/bin. Again, I’d suggest calling the file
sys_info_page.sh.Also, once you have the first version of the
sys_info_page.shscript,git add,git commitandgit push. -
p. 373: Second Stage: Adding a Little Data: Let’s add a little more of the git workflow here. We’ll come back to this, but let’s take a look at branches in git first.
More on git branches
Every repo has one branch, hopefully called main. But you can create branches that essentially give you another copy to work on without messing up that main copy. When you are satisfied with the changes you have made, they can be merged back into the main branch. Or, if you mess things up or realize your idea was not well thought out, you can just delete it and not worry that you could have messed up your main branch.
Here is an image to illustrate the idea:

We currently have a functional script that we are happy with. We are about to start making some major changes. Rather than making these changes here, it is easier to make a branch of the repository. This allows us to try new things, test features, etc. without messing up the current functional version. If we don’t like what we do, it is easy to trash it and be back where we are. If we do like it, we can merge our changes back into the main branch and have the new version become the main version.
Let’s create a branch called variables (we are going to learn about variables as we do this section).
  [magitz@login3 sys_info_page]$ git branch variables
  [magitz@login3 sys_info_page]$ git checkout variables
  Switched to branch 'variables'
  [magitz@login3 sys_info_page]$
These two commands could have also been simplified to the single git checkout -b variables, which creates and checks out the branch in one step.
-
p. 373: Second Stage: Adding a Little Data: make these changes and then run the
git add,git commit,git pushcommands.[magitz@login3 sys_info_page]$ git add sys_info_page.sh [magitz@login3 sys_info_page]$ git commit -m "Add a little data" [variables f512adf] Add a little data 1 file changed, 2 insertions(+), 2 deletions(-) [magitz@login3 sys_info_page]$ git push fatal: The current branch variables has no upstream branch. To push the current branch and set the remote as upstream, use git push --set-upstream origin variables [magitz@login3 sys_info_page]$Note: Notice how the initialgit pushcommand fails. git tells you there is a fatal error because there is not avariablesbranch on github (we just created it here).gitis also helpful and suggests a command that you may have wanted to use instead:git push --set-upstream origin variableswhich says, create avariablesbranch at theorigin(github.com) and push the content there.[magitz@login3 sys_info_page]$ git push --set-upstream origin variables Counting objects: 5, done. Delta compression using up to 32 threads. Compressing objects: 100% (3/3), done. Writing objects: 100% (3/3), 415 bytes | 0 bytes/s, done. Total 3 (delta 0), reused 0 (delta 0) remote: remote: Create a pull request for 'variables' on GitHub by visiting: remote: https://github.com/magitz/sys_info_page/pull/new/variables remote: To git@github.com:magitz/sys_info_page.git * [new branch] variables -> variables Branch variables set up to track remote branch variables from origin. [magitz@login3 sys_info_page]$Now, let’s go look at the repo on github. Click on the
sys_info_page.shfile to view it in the repo.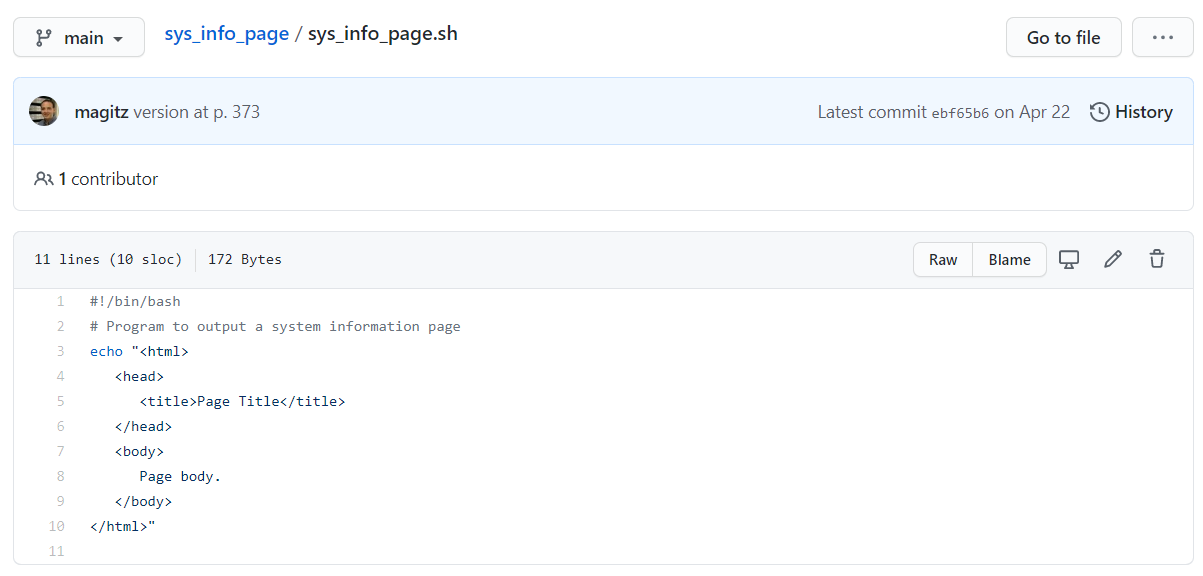
The repo still looks like it did before! That is because the
mainbranch is set to be default. But you can click on the “Branch: main” button and select “variables” to see that version.In fact the original file is still there in our folder too. Checkout the
mainbranch and look at the file:[magitz@login3 sys_info_page]$ git checkout main Switched to branch 'main' [magitz@login3 sys_info_page]$ cat sys_info_page.sh #!/bin/bash # Program to output a system information page echo "<html> <head> <title>Page Title</title> </head> <body> Page body. </body> </html>" [magitz@login3 sys_info_page]$This is part of the magic of
git!Warning: The wonders ofgita brought to you by a special hidden folder called.gitlocated in the root folder of a git repository. Do not mess with this folder! It is hidden for a reason! If you go in there and start messing with stuff, bad things will happen!Checkout the
variablesbranch again and keep working through the chapter. Remember togit add,git commit,git pushnow and then–typically when you think you have point in time you might want to return to, or have done a significant change.
Merging git branches
At some point we decide we are ready to merge the branch back into the main branch. This updates the main branch with the changes you have made in the development branch.
If you are the only one working and you are only working on one thing, this may be simple. If other developers have made changes to the main branch, there may be conflicts that your changes create–if you both change the same lines of a file, git can’t merge on its own and needs your help to resolve the conflicts. We will come back to this later, but since you shouldn’t have any conflicts, you are set to merge…
Checkout the main branch and then merge:
  [magitz@login2 sys_info_page]$ git checkout main
    Switched to branch 'main'
  [magitz@login2 sys_info_page]$ git status
  # On branch main
  nothing to commit, working directory clean
  [magitz@login2 sys_info_page]$ git merge variables
  Updating 8ad541d..2627d71
  Fast-forward
  sys_info_page.sh | 41 ++++++++++++++++++++++++++++++++---------
  1 file changed, 32 insertions(+), 9 deletions(-)
  [magitz@login2 sys_info_page]$ git push
  Total 0 (delta 0), reused 0 (delta 0)
  To https://github.com/magitz/sys_info_page.git
    8ad541d..2627d71  main -> main
Since we are done with the variables branch we can delete it:
  [magitz@login2 sys_info_page]$ git branch -d variables
  Deleted branch variables on (was 2627d71).
Ch 26: Top-Down Design
When you are working through this process, you may get stuck. Take a break. Work on something else. Maybe make a sketch of what you want to do. Ask for help!
git, using branches as you implement changes, pushing to github.com, merging branches back into main when you are done with a section, etc.There is a ton of great stuff in this chapter and you can work through most of it. Sometimes we talk about writing pseudocode. Writing down the steps, as the text does for going to the market on p. 383 is a good way to start breaking down what you need your code to do. Lay out, what do I have, where to I need to get? Fill in the steps you would take to get there. Add more details iteratively. As you go, your notes will progressively look more and more like code. You can start translating steps into real code. Again, breaking down the task into pieces is the main challenge in writing a program. People often get scared by focussing on the goal and not being able to see how to get there, but when you break it down into pieces, each step becomes more tractable and the whole program emerges.
Some notes…
- p. 384: Shell Functions: Functions facilitate breaking down code into manageable chunks. Using the text’s analogy, we can write a function to park the car. Once we have the park_car function, that part of the go to the market problem is solved. In fact, that part is solved both when we park the car at the market and when we park the car at home when we return! Write once, use many times–this greatly facilitates our coding experience. Additionally, if we realize that we forgot to, for example, add the step to set the parking break, we only need to update the code one place, rather than find everywhere we used the parking code. And lastly, if we move on to writing a program for going to the work, we can re-use the park_car function from this program in the new program!
Passing arguments into functions
I did not realize until someone asked, that this was not covered in the text. It seems so fundamental to how functions work that it didn’t even occur to me that it wouldn’t be covered…Adding this information now.
We’ve seen how functions can be used to organize code, promote reusability, and help us think about the steps that are needed to accomplish a task. It may not be clear from the text that functions, similar to scripts and programs, can take input arguments and return information. In keeping with the driving to the market analogy, the park_car function might take a parking lot isle number as an argument and return the parking spot number so you know where your car is parked.
Here is an example of a function that takes two numbers, adds them and returns the sum, this script is also located at /blue/bsc4452/share/Class_Files/Examples/add_two.sh:
  #!/usr/bin/bash

  # This script shows how parameters can be passed into a function

  add_two () {
    # Take 2 numbers and add them, returning the sum

    num1=$1 # The first argument is $1, assign to num1 variable
    num2=$2 # The second argument is $2, assign to num2 variable

    sum=$((num1 + num2))  # Add the two numbers
    return $sum  # Return the sum
  }

  value1=5
  value2=10

  add_two $value1 $value2  # Call the add_two function with 2 arguments

  echo "$value1 plus $value2 is $?"  # Print the result
When we call the function add_two we can pass in our two numbers. Those are assigned to the variables $1 and $2. There is also a special variable created that lists all of the arguments passed in, its name is $@. Try modifying the code of the add_two function to print the value of $@ when it is called.
We can use those variables in the function to do our stuff. Then we can return information from the function. The main script can use the returned value with the $? variable.
Note that Bash does not include the argument names in the function definition line…most languages, including Python, would have something like add_two (arg1, arg2) indicating that the function takes two arguments. That’s just not how Bash works…
For additional information, I found this page to be helpful: https://bash.cyberciti.biz/guide/Pass_arguments_into_a_function.
Back to the text…
-
p. 387: Local Variables: It is good to think about local vs global variables and the concept of scope. We will encounter this throughout the semester as local and global variables are common to most programming languages. The idea is that most variables defined within a function are local to that function, are only available within the function, and are lost when the function ends.
-
p. 388-389: Keep Scripts Running: The idea of using stubs is very useful. This is also a good method to share code development. One developer can work on implementing one function, while another developer implements a different function.
Warning: WARNING!!
When you get the p. 391, where you implement thereport_home_space()function, Do not implement as written! The TLCL version tries to get home directory use for all users. There are several thousand users on HiPerGator! Do not try to run this! But if you do and it is taking forever, Control-C (Ctrl-C) will cancel the program. -
p. 391: Modification to
report_home_space(): I suggest using the following in place of what is in TLCL (use your GatorLink, not mine…). This will check your home directory space usage…report_home_space(){ cat <<- _EOF_ <h2>Home Space Utilization</h2> <pre>$(du -sh /home/magitz/*)</pre> _EOF_ return